Can if Feed Sticker Paper Through Drawer
Solution
The following kinds of paper can be loaded in the multi-purpose tray.
| Paper Type | Paper Size | Loading Procedure |
| Plain paper | - Standard sizes A3, B4, A4, B5, A5, SRA3, 12 x 18, Ledger (11 x 17), Legal, Letter, Executive, Statement, 8K, 16K - Custom paper sizes, Long sizes | See "Loading Paper (Other than Envelopes)" |
| Heavy paper (106 - 169 g/m  ) ) | ||
| Heavy paper (170 - 220 g/m ) | ||
| Coated paper | A3, A4 | |
| Labels | A4 | |
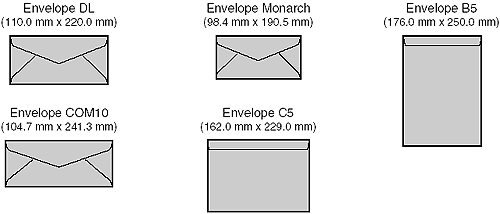
| Envelopes | Envelope DL (110.0 mm x 220.0 mm) Envelope COM10 (104.7 mm x 241.3 mm) Envelope C5 (162.0 mm x 229.0 mm) Envelope Monarch (98.4 mm x 190.5 mm) Envelope B5 (176.0 mm x 250.0 mm) | See "Loading Envelopes" |
Loading Paper (Other than Envelopes)
Perform the following procedure to load plain paper, heavy paper, coated paper, or
labels in the multi-purpose tray.
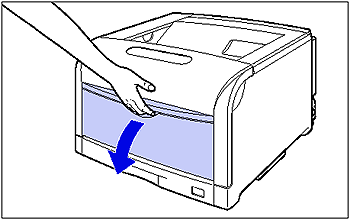
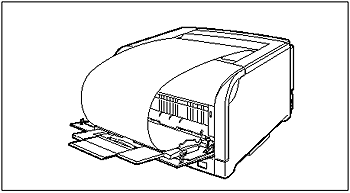
1. Open the multi-purpose tray.
Holding the opening at the center of the printer, open the multi-purpose tray.
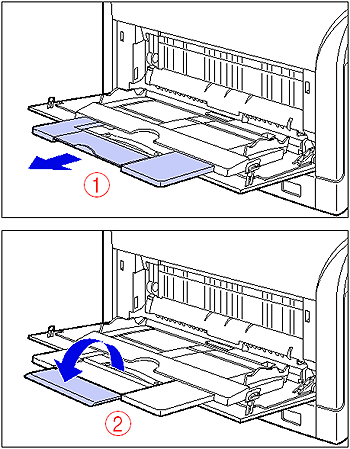
When loading long-size paper such as A3 and A4, pull out the auxiliary tray (1),
and then open the tray extension (2).
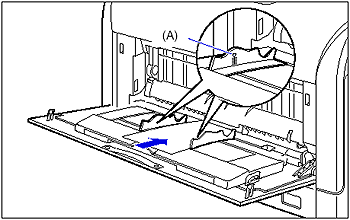
2. Spread the paper guides a little wider than the actual paper width.
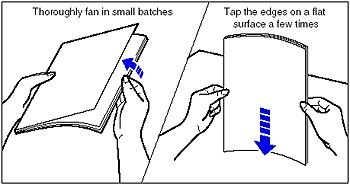
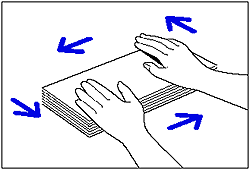
3. Before loading coated paper or labels, fan them in small batches and align the edges.
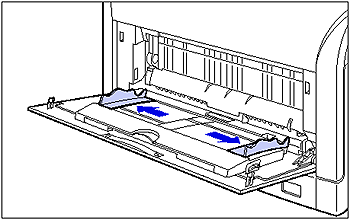
4. Gently load the stack of paper with the printing side facing down until it touches the back of the tray.
5. Align the paper guides with both sides of the stack.

Next, specify the paper size and paper type for the multi-purpose tray.
When printing from the printer driver, configure the printer driver next.
- STD PAPER SIZE = the size of the loaded paper
- STD PAPER TYPE = the type of the loaded paper
6. Specifying the paper settings in the printer driver.
When printing from the printer driver, specify the following settings. For more details on using the printer driver, see Help of the printer driver.
| Sheet | Setting | Description |
| [Page Setup] Sheet | [Page Size] | Select the paper size of the document created by an application. |
| [Output Size] | Select the size of the loaded paper as needed. Leave the setting at [Match Page Size] when the page size and the size of the paper loaded in the multi-purpose Tray are the same, since there is no need to change the setting. | |
| [Custom Paper Size] | To use custom size paper for printing, click [Custom Paper Size] in the [Page Setup] sheet, and then specify the custom paper size. | |
| [Paper Source] Sheet | [Paper Source] | Select the paper source. When [Auto] is specified, if a paper size is specified by an application, the printer selects the paper source automatically and feeds paper from the paper source. Specify the same setting as the one for [Paper Source], although the setting for [Paper Source] changes to ones such as [First Page] or [Other Pages] when [Paper Selection] is set to other than [Same Paper for All Pages]. |
| [Paper Type] | Select the type of the loaded paper. - [Plain Paper]: Plain Paper (64 - 105 g/m )- [Heavy Paper 1]: Heavy Paper (106 - 169 g/m )- [Heavy Paper 2]: Heavy Paper (170 - 220 g/m )- [Label]: Labels - [Coated Paper]: Coated Paper |
Loading Envelopes
You can load envelopes at sizes of DL, COM10, C5, Monarch, and B5 in the multi-purpose tray. Use the following procedure when loading envelopes in the multi-purpose tray.
IMPORTANT
- The envelopes that can be used with this printer are Envelope DL, Envelope COM10, Envelope C5, Envelope Monarch, and Envelope B5 with the following structures only.
* You cannot use envelopes at sizes of DL, COM 10, Monarch, and C5 that have a flap on the short edge.
- Do not use the envelopes with adhesive on the surface. This may result in poor print quality or damage to the printer.
- When printing envelopes, you cannot print on any area within 10 mm (4 mm for the PS printer driver) of the edges of paper. (If you have selected the [Print with Upper Left of Sheet as Starting Point] check box in the [Finishing Details] dialog box in the UFR II printer driver, you can extend the printable area to near the edges of the paper. For more details, see Help of the UFR II printer driver.)
- Printing speed drops when printing envelopes.
NOTE
When printing envelopes, they may be creased.
1. Open the multi-purpose tray.
Holding the opening at the center of the printer, open the multi-purpose tray.

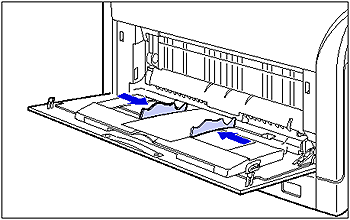
2. Spread the paper guides a little wider than the actual envelope width.
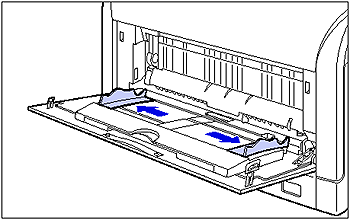
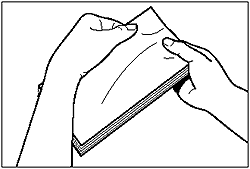
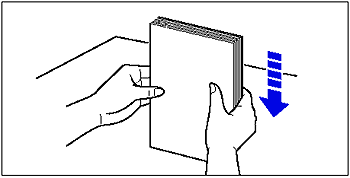
3. Place the stack of envelopes on a flat surface, flatten them to release any remaining air, and be sure that the edges are pressed tightly.
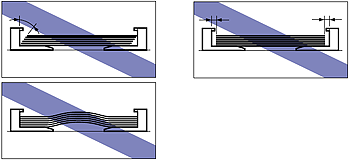
4. Loosen any stiff corners of the envelopes and flatten curls as shown in the figure.
5. Align the edges of the envelopes on a flat surface.
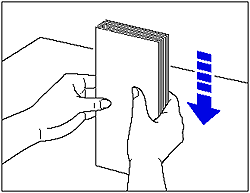
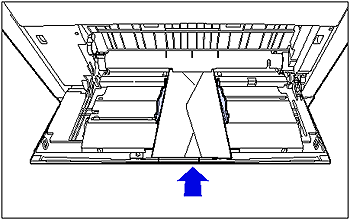
6. Gently load the stack of envelopes with the address side facing down and with the flaps closed and on the right side, until it touches the back of the multi-purpose tray as shown in the figure.
7. Align the paper guides with both sides of the stack.
Next, specify the paper size and paper type for the multi-purpose tray.
When printing from the printer driver, configure the printer driver next.
- STD PAPER SIZE = the size of the loaded paper
- STD PAPER TYPE = the type of the loaded paper
8. Specifying the paper settings in the printer driver.
When printing from the printer driver, specify the following settings. For more details on using the printer driver, see Help of the printer driver.
| Sheet | Setting | Description |
| [Page Setup] Sheet | [Page Size] | Select the paper size of the document created by an application. |
| [Output Size] | Select the size of the loaded paper as needed. Leave the setting at [Match Page Size] when the page size and the size of the paper loaded in the multi-purpose Tray are the same, since there is no need to change the setting. | |
| [Paper Source] Sheet | [Paper Source] | Select the paper source. When [Auto] is specified, if a paper size is specified by an application, the printer selects the paper source automatically and feeds paper from the paper source. Specify the same setting as the one for [Paper Source], although the setting for [Paper Source] changes to ones such as [First Page] or [Other Pages] when [Paper Selection] is set to other than [Same Paper for All Pages]. |
| [Paper Type] | Select the type of the loaded paper. - [Envelope]: Envelopes |
Precautions on Loading Paper in the Multi-purpose Tray
IMPORTANT
- Be sure to fan the coated paper or labels thoroughly before loading them. If they are not fanned enough, multiple sheets of paper may be fed at once, causing paper jams.
- When fanning or aligning coated paper, try to hold the edges to avoid touching the printing surface.
- Take care not to mark or stain the printing surface of the coated paper with fingerprints, dust, or oil. This may result in poor print quality.
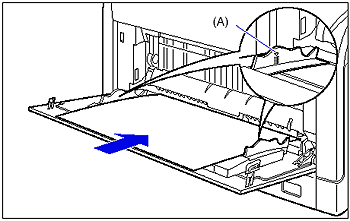
- When loading long size paper, load one piece at a time in the multi-purpose tray as shown in the figure.
- The multi-purpose tray can be loaded with up to the number of sheets listed below. Make sure that the paper stack does not exceed the load limit marks.
- Plain Paper : Approx. 90 sheets (Ex. 80 g/m)
- Heavy paper : Approx. 50 sheets (Ex. 128 g/m)
- Coated Paper : Approx. 50 sheets
- Label : Approx. 40 sheets
- Envelope : Approx. 10 envelopes
- Load the paper so that it is straight.
- If the rear edge of the paper stack is not properly aligned, it may result in misfeeds or paper jams.
- If the paper is curled or folded at corners, flatten it before loading it in the printer.
- If you use paper that has been poorly cut, multiple sheets of paper may be fed at once. In this case, align the edges of the stack on a hard, flat surface.
- Be sure to align the paper guides with the width of the paper. If the paper guides are too loose or too tight, this may result in misfeeds or paper jams.
- You cannot print on the reverse side (glued side) of envelopes.
- When loading envelopes at a size of DL, COM10, C5, or Monarch, load them so that the flap is toward the right of the printer when viewed from the front.
- When printing envelopes of the Envelope B5 size, close the flaps and load them so that the envelopes are printed from the top (the edge with the flap).

NOTE
- If you want to print custom size paper of its long edges 297.0 mm or less when TRAY PAPER SIZE in the FEEDER MENU options in the SETUP is set to MIXED SIZES, specify the settings according to the printer driver you are using as follows.
- When using UFR II Printer Driver: Load the paper in landscape orientation
- When not using UFR II Printer Driver: Load the paper in portrait orientation
- To print paper with letterheads or logos, see [Paper Loading Orientation] and load the paper in the proper orientation.
Can if Feed Sticker Paper Through Drawer
Source: https://in.canon/en/support/8200036200
0 Response to "Can if Feed Sticker Paper Through Drawer"
Post a Comment